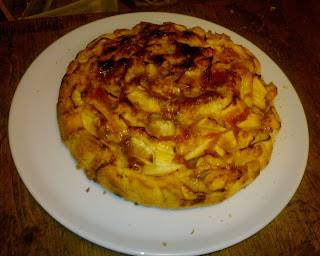
Wednesday, 31 July 2013

Cake twenty-seven alias Bread one - Multigrain Dove

Get inspired 
This is my favourite bread and the shape I like most: It’s a must on my Easter table, dove is in fact a symbol for this day: we do have a ‘Dove’ cake in Italy just as we have ‘Panettone’ for Christmas.
Whether you use a bread machine or not you need a few hours before your bread is ready. I don’t have a bread machine although I’ve been thinking to buy one for some years. In fact it’s quite practical and saves a lot of your time: you don’t need to knead your dough more than once which is in some cases hard work. When you make bread the old style, I mean without a bread machine, you need a whole morning considering rise and knead times - I’m speaking of yeast bread of course! Anyway I think you should try and I'm sure you'll love it! 

50 g buckwheat 
80 g pearled barley
50 g sunflower seeds
10g dry yeast
1 teaspoon sugar
180 ml warm milk
60 ml warm water
235g white plain flour
180g wholemeal plain flour
1 teaspoon salt
2 teaspoons olive oil 
1 egg yolk
1 teaspoon milk, extra
2 teaspoons sesame seeds, extra
Place buckwheat, pearled barley and sunflower seeds in small heatproof bowl, cover with boiling water, cover and stand 30 min. Then rinse and drain well.
In the meantime combine yeast, sugar, milk and water in small bowl, whisk until yeast is dissolved. Cover and stand in warm place about 20 min or until mixture looks frothy. 
Put flour and salt into a large bowl, add grain mixture, oil and yeast mixture. Mix to a soft dough. Turn dough onto a floured surface and knead well until dough is smooth and elastic (about 10 min).
Place dough in large greased bowl, cover and stand in warm place about one hour or until dough has doubled in size. 
Turn dough onto a floured surface, knead until smooth. Divide it into 3 pieces, shape each piece into a 30cm sausage. 
Plait sausages and place dough into a greased loaf pan.

Cover, stand in warm place about 30 min or until risen.

Brush dough with combined egg yolk and extra milk. Sprinkle with sesame seeds.
Bake at 200° for about 45 min

Monday, 15 July 2013

Cake twenty-six Sicilian Cassata

Get inspired

It’s a cake which steals a lot of your time and patience of course. It’s not too difficult to make, anyway: you need some practice to get to the right combination of good taste and elegant decoration but it’s well worth a try! 
Consider one day to bake and assemble it, then another day in the fridge before decoration and a couple of days before eating so that all the flavours can harmoniously blend in.

Step 1 - Sponge Cake
6 eggs, separated
250 g sugar
250 g flour
Beat yolks and sugar with electric mixer until thick and foamy. Fold in flour. In the meantime beat egg whites with electric mixer until soft peaks form. Gently fold a little of the beaten egg whites into the batter to lighten it and then add the rest of the whites folding just until incorporated. Do not overmix the batter or it will deflate. Pour mixture evenly into a 20cm-round tin and bake cake at 180° for about 30 min.  or until a toothpick inserted into the center of the cake comes out clean. 
Immediately turn cake onto a wire rack prepared with baking parchment to cool.  

Step 2 - Ricotta filling
1 kg fresh ricotta
250 g sugar 
100 g chocolate, chopped 
Should ricotta be too wet, place it on a colander for about 30 min. Then whip ricotta and sugar with an electric mixer until well blended and smooth. Fold in the chocolate. Refrigerate.

Step 3 - Marzipan
200 g marzipan 
green food colouring
Knead marzipan and some green food colouring until you get a vivid green and the colour is uniform.

Step 4 - Cake assembling
sponge cake
green marzipan 
some vermouth 
ricotta filling 
plastic wrap
Line a 30cm frying pan with plastic wrap. 
Roll out a 10cm wide marzipan stripe. Line the side of the pan as in photo. Cut the sponge cake into 1cm thick slices and use them to line the base and sides of the frying pan. Sprinkle some vermouth over the slices until they’re moist but not wet. Spread ricotta filling evenly over cake base. Top with remaining cake slices and sprinkle vermouth over cake. 


Refrigerate for at least one day.

Step 5 - Royal Icing
2 egg whites
375 g icing sugar
some lemon juice
Whip egg whites and sugar with an electric mixer until hard peaks form. Pour in some lemon juice.

Step 6 - Cake assembling
Cake in the frying pan
Royal icing 
Candied fruit: cherries, citron, a tangerine, or any fruit of your choice.
Turn Cassata onto serving plate. Discard plastic wrap.


 Decorate the cake to your taste. Refrigerate for 3/4 hours at least.


also visit:

Sunday, 26 May 2013

Cake twenty-five Choco Lollipops

Get inspired


You don’t need special ingredients for these lollipops: you need chocolate, of course, patience, some free time, your fancy and the right moulds! They’re not complicated to make but you have to proceed step by step and be extremely precise when filling the spaces if you’re using chocolate of different colours.
These chocolate lollipos are in the shape of an egg, and they’re typical of Easter but chocolate is too good to be limited to a special time of the year... so you don’t have to wait until next year to have a go.

g 100 white chocolate 
g. 200 milk chocolate
g. 300 dark chocolate
any food dye you like
lollipos sticks

1. Make sure your lollipop mould is clean and dry.

2. Melt chocolate first of all. You can use a microwave which is faster, if you like  but I prefer the double boiler as you can better control the temperature. Set up your double boiler with a small amount of water - the water should not be touching the top pan- and warm it over medium-low heat. 
Start with white chocolate. Cut it in small pieces and place them into pan,  stirring occasionally, just until the mixture is smooth, then remove the pan from the heat. White chocolate is particularly sensitive to burning, so take extra care and stir meticulously.

3. When chocolate is melted and smooth, take a spoon and dip it into the white chocolate. Place enough white chocolate in the bottom of each cavity. 

4. Refrigerate for about 10 minutes or until chocolate is set. 

5. Melt the milk chocolate following the same procedure. 

6. Place some chocolate spoonfuls into the mould and continue to add until cavities are full.

7. Position lollipop sticks in place. 

8. Refrigerate to set. 

9. Pop the lollipops out of the  moulds. Decorate to your taste. Place them in small cellophane bags with a ribbon, for example.

You can alternatively use dark, milk or white chocolate and add any food colouring too. It’s all up to you and you fancy!


also visit:

Sunday, 5 May 2013

Cake twenty-four - Bunnies, Bunnies, Bunnies...

Get inspired

It’s a quick and easy recipe I often use for cakes with special shapes. I’ve recently made a basket for some choco bunnies and roses.. since it was Easter time and Spring. 
It was on the box of a bunny mould, no special ingredients, you’ll see, it’s the combination of butter and choco chips that makes this cake delicious. Anyway it’s a cake you should eat the same day you make it to taste its full flavour, but I never do...... I like to watch my creations....

1 egg
70 g butter or margarine
70 g sugar
a pinch of salt
90 g flour 
1/2 teaspoon baking powder

Separate the egg. Beat the egg white with half of the sugar until stiff. Beat the egg yolk with the rest of the sugar, butter and salt until fluffy, mix the baking powder into the flour and stir in. Then fold in the beaten egg white. 
Grease your mould with butter and sprinkle with breadcrumbs. Fill in the mixture and smooth out. Bake at 180° for 35/40 min. Wrap in a damp cloth after baking. Carefully remove from the mould after 10 minutes and allow to cool down.
Then set your fancy free and decorate using some glacé icing. 


Saturday, 27 April 2013

Cake twenty three - Easter Eggs

Get inspired 

Patience is the secret ingredient for chocolate eggs and of course good quality chocolate!
It’s better to start from smaller chocolate eggs if it’s your first time.. 
Eggs can either be empty inside or solid, in which case you can fill them with a creamy chocolate mixture, some small meringues or crunched hazelnuts.

Plain Solid Eggs
200 g dark chocolate 
Cut chocolate in small pieces and place it in a heatproof bowl over a saucepan half filled with simmering water. Stir until it’s melted. 
Pour spoonfuls of the melted chocolate into the choco egg moulds until they’re filled up to the brim. Remove excess chocolate with the help of a knife to ensure a clean edge. Refrigerate until set. Carefully un-mould the egg halves and place them on a clean surface. Don’t touch them too much or they will start to melt from the heat of your hands. Heat a knife, take two halves, gently push them together and use the knife to stick them together. The blade musn’t be too hot or you’ll have holes in the egdes.
Follow the same procedure for bigger eggs.. 

Rich Solid Eggs
200 g dark chocolate
100 g milk or white chocolate
100 g small meringues
100 g crunched hazelnuts
Repeat same procedure to melt chocolate. Pour spoonfuls of the cholate into the mould, use a knife to scrape the excess chocolate from the mould. Give it a good vibrating shake so that all the air bubbles are gone. Scrape again. Let the chocolate sit for about 5 min, then flip the mould over allowing the chocolate to pour out. Scrape once more time to ensure the neatest shells. Flip it back. Cool a fe
w minutes. 


Now you can fill them with some melted milk or white chocolate and add some small meringues or hazelnuts to your taste. Let filling sit for about 15 minutes, then pour more melted chocolate over the mould. Scrape again to remove any excess. Refirgerate for 15 minutes. Then place in the freezer for 5 minutes and they’re ready to un-mould. Now carefully push the two halves together and use a heated knife to stick them together.

Fancy Chocolate Easter Egg
300 g dark, milk or white chocolate

Follow same procedure. Decorate to your taste.

Add some Rice Krispies when the chocolate is melted if you want to make a really special Easter Egg. 
Use Coco Pops if you’re making a white chocolate egg.

also visit: 
http://time-for-a-cake.blogspot.it/2013/04/cake-twenty-three.html

Monday, 1 April 2013

Cake twenty-two - Cheesecake delice

Get inspired


I think decoration is a key point in a cake and not only a matter of ‘appearance’: it’s your personal touch! 
Berries are a must for cheesecakes, I must say, and raspberries among them all are the best choice. I particularly love them for their bright colour which gives the cake a kind of luxurious look and secondly, but not certainly less importantly, for their taste which is a mix of sweet and sour juicy fragrance which easily blends in with most of the cakes and above all with cheesecakes.
It can be a yummy birthday cake in Summer!

250 g plain chocolate biscuits
150 g butter, melted
2 tbsp brown sugar
20 g butter, extra
300 ml thickened cream
50 g milk chocolate, chopped finely
3 tsp gelatine
60 ml water
500 g cream cheese
110 g sugar
3 Mars bars, chopped finely 
200 g. raspberries
Process biscuits until mixture resembles fine breadcrumbs, add butter. Process until just combined. Press biscuit mixture over base and side of 20cm round tin. Cover and refrigerate about 30 minutes or until firm. 
In the meantime combine brown sugar, extra butter and 2 tbsp of the cream in a small saucepan. Stir over low heat until sugar dissolves, to make butterscotch sauce.  
Combine chocolate and another 2 tbsp of the cream in another saucepan stirring over low heat until chocolate melts.
Sprinkle gelatine over the water in small heatproof jug. Place jug in small saucepan of simmering water and stir until gelatine dissolves. Cool 5 minutes.
Beat cheese and sugar in a bowl with electric mixer until smooth. Beat remaining cream in small bowl with electric mixer until soft peaks form. Stir slightly warm gelatine mixture into cheese mixture with Mars bar. Fold in cream. 
Pour half of the cheese mixture into the prepared tin, drizzle half of the butterscotch and chocolate sauces over cheese mixture. Pull skewer backwards and forwards through mixture to create marbled effect. Repeat process with remaining cheese mixture and sauces. 
Cover and refrigerate about 3 hours. 

also visit:
http://time-for-a-cake.blogspot.it/2013/03/cake-twenty-two.html

Sunday, 17 March 2013

Cake twenty-one - Spring Swirl

Get inspired

A good cake to cheer you up in the morning or any time you need sometihng sweet to make your day a better day! It might seem one of the so many apple cakes, but it is not! Just try!


100 g sugar
100 g butter
200 g flour
50 g cornflour
2 eggs
75 ml water
1 lemon, grated rind and juice
1/2 packet baking powder
3/4 apples 
Beat butter and sugar with electric mixer until smooth and creamy, then add grated rind and water. Beat in the eggs, adding some flour after each egg. Finally stir in the flours and baking powder. 
Line a 24 cm round cake pan with baking paper. Pour mixture into pan. Peel, core quarter and thinly slice apples. Arrange the sliced apples in circles on the mixture and sprinkle with lemon juice. 
Bake for about 50/60 minutes at 180°.

also visit: 
http://time-for-a-cake.blogspot.it/2013/03/cake-twenty-one.html