Showing posts with label fondant. Show all posts

Sunday, 4 August 2013

Cake twenty-eight Lilac Chic

Get inspired

There’s something in the tiered cakes which attracts me a lot. It’s like a personal challenge, the kind of ‘Will I be able to make it?’, in other words a chance to test my skills. Sure, but not only! There’s also some unconscious reason which takes me back to a happy memory from my childhood: a photo of one of my first birthdays, me with my parents and a two-tiered birthday cake decorated in white with some silver pearls my mum had made for me.. 
Although decoration is very important as it’s what we see first, the choice of the cake is nonetheless relevant since it’s what we actually eat.
When making a tiered cake you should always choose a solid cake which can stand the weight of the other cakes you put on top. 
For this cake we chose three different cakes which all have, anyway, a common ingredient - chocolate. (My younger daughter loves it...)

Phase 1: Recipes

Dark Chocolate Mud Cake
250 g butter, chopped
150  g dark chocolate, chopped
440 g sugar
250 ml milk 
225g flour
75 g self-raising flour
2 eggs, lightly beaten 
2 tbs cocoa powder
150 g fresh raspberries
Put butter, chocolate, sugar and milk in medium saucepan, stir over heat without boiling, until smooth. Cool 15 minutes. Add flours, eggs and raspberries.  
Line base and sides of a 30cm-round cake pan with baking paper. Pour mixture into pan. Bake at 150° for 50 minutes. Cool cake.

White Chocolate Mud Cake
250 g butter, chopped
150  g white chocolate, chopped
440 g sugar
250 ml milk 
225g flour
75 g self-raising flour
2 eggs, lightly beaten 
2 tbs cocoa powder
150 g fresh blackberries or 150 g choco drops
Same procedure as Dark Chocolate Mud Cake.
Bake two cakes: one in a 30cm round cake pan - use blackberries; the second one in a 24cm round cake pan - use chocolate drops.

Chocolate icing
200 g chocolate, chopped
200 g icing sugar
1 egg
Melt chocolate in small saucepan over boiling water. Cool. Add egg and icing sugar. Stir until smooth.

Chocolate Butterscotch Cake
25 g cocoa powder
250 g butter
200 g brown sugar
2 eggs
1 tbs golden syrup
185 g self-raising flour
125 ml milk
Beat cocoa, butter, brown sugar, eggs, golden syrup, flour and milk with electric mixer until combined.
Line base and sides of a 18 cm-round cake pan with baking paper. Pour mixture into pan. Bake at 180° for about 1 hour. Cool cake.

Mascarpone Cream
250 g mascarpone cheese
300ml thickened cream
Mix mascarpone and cream until soft peaks form.

Caramel Icing
60g butter
100g brown sugar
60ml milk 
240g icing sugar
Heat butter, brown sugar and milk in small saucepan, stirring constantly, without boiling, until sugar dissolves. Remove from heat. Add icing sugar and stir until smooth.

Phase 2: Tiers
Here’s a sketch of the cake showing details of each tier.
1. Chocolate Butterscotch Cake
2. White Chocolate Mud Cake (with raspberries)
3. White Chocolate Mud Cake (with choco drops)
4. White Chocolate Mud Cake (with raspberries)
5. Dark Chocolate Mud Cake (with blackberries)

A. Mascarpone & Caramel Icing
B. Choco Icing

Phase 3: Decoration
purple and peach food colour
600/700 g ready-made white fondant
some corn starch
Assemble and decorate each tier separately. 

Bottom tier
Take the Dark Chocolate Mud Cake and place it onto serving plate.  Spread with chocolate icing.
Take the 30cm round White Chocolate Cake and split into two layers. Put one layer on top of cake and leave second layer aside for middle tier.
Dust a large nonstick mat lightly with corn starch and knead fondant until smooth and pliable.
Roll fondant out in the approximate shape of the cake. Roll fondant up around rolling pin and then place it onto the cake. You can cut out the centre of the circle if you don't have enough fondant.
Add some purple and peach food colour to some white fondant and knead until you have the colour you like. Roll it out and cut about 30 2cm wide circles. 
Decorate cake with some of the circles using some mascarpone cream to help them stick to the cake.

Middle tier
Cut the second 30cm round White Chocolate Cake layer the same size as the 24cm round White Chocolate Cake. 
Place one 24cm round cake on a plate, spread with chocolate icing and put second cake on top.
Colour some fondant the same shade as the spots and follow same procedure as per cake from bottom tier.

Top tier
Split Chocolate Butterscotch Cake into three layers. Put one layer on a plate, spread with some mascarpone cream and some caramel icing. Repeat with second and third layer. Cover cake with white fondant and purple spots.

Phase 4: Assembling the cake 
Once all cakes are ready assemble the cake and carefully put one tier on top of the other.


Friday, 2 November 2012

Cake thirteen - A Flowerbed


Get inspired

Cupcakes are the most versatile of cakes to be used for any occasions and design. Close your eyes think of what you like most and there you are.... with some ability you can have your cupcake the shape you like! That’s what my daughters made for me. 

Choose your cupcake recipe, I often choose lemon cupcakes (see recipe - cake five simply add some grated lemon peel) as decoration and/or frosting are already rather sweet..

150 g white fondant (see recipe in cake twelve)
1 quantity yellow glacé icing (see recipe in cake twelve- add some yellow food colouring)
1 quantity choco frosting
5 cupcakes
yellow food colouring

Choco frosting 

100 g dark chocolate
2 tablespoons milk
50 g butter
75 g icing sugar
Put the chocolate, milk and butter in a small saucepan and heat gently, stirring frequently until the chocolate and butter have melted and are evenly distributed.
Remove fron the heat and stir in the icing sugar until the frosting is smooth and shiny.

1) Anemone petals

Crumple a sheet of aluminum foil and place on a small baking sheet (the folds of the foil will enable the petals to set in curved shapes). For each anemone rollout one-fifth of the white fondant on a surface lightly dusted with icing sugar. Cut out five disks using a 3,5 cm cookie cutter. Lift up one of the disks (lightly dust your fingers with icing sugsr before!) Press your thumb into the centre, mould the edges of the petal to look more realistic.Place on the cumpled alumium foil so the folds of the foil support the fondant petal. Repeat with the remaining 4 disks. Make four more sets of petals in the same way plus a few spares out in case of breakages. 
Beat yellow food colouring into a small ball of fondant. Make five balls, and flatten them into the shape of a corolla. Leave for several hour to harden.

2) Preparing the cupcakes
Spread the choco frosting generously over the cupcakes.

3) Finishing touches

Arrange five petals in an overlapping circle on each cupcake, leaving a small gap in the centre. Press the petals carefully down into the frosting, then pipe some yellow glacé icing in the middle of the flower. For the stamens, use some sugar decoration.

Happy Birthday writing

Use some yellow glacé icing to write Happy Birthday Mum or what you like.


also visit:
http://time-for-a-cake.blogspot.it/2012/10/cake-thirteen.html


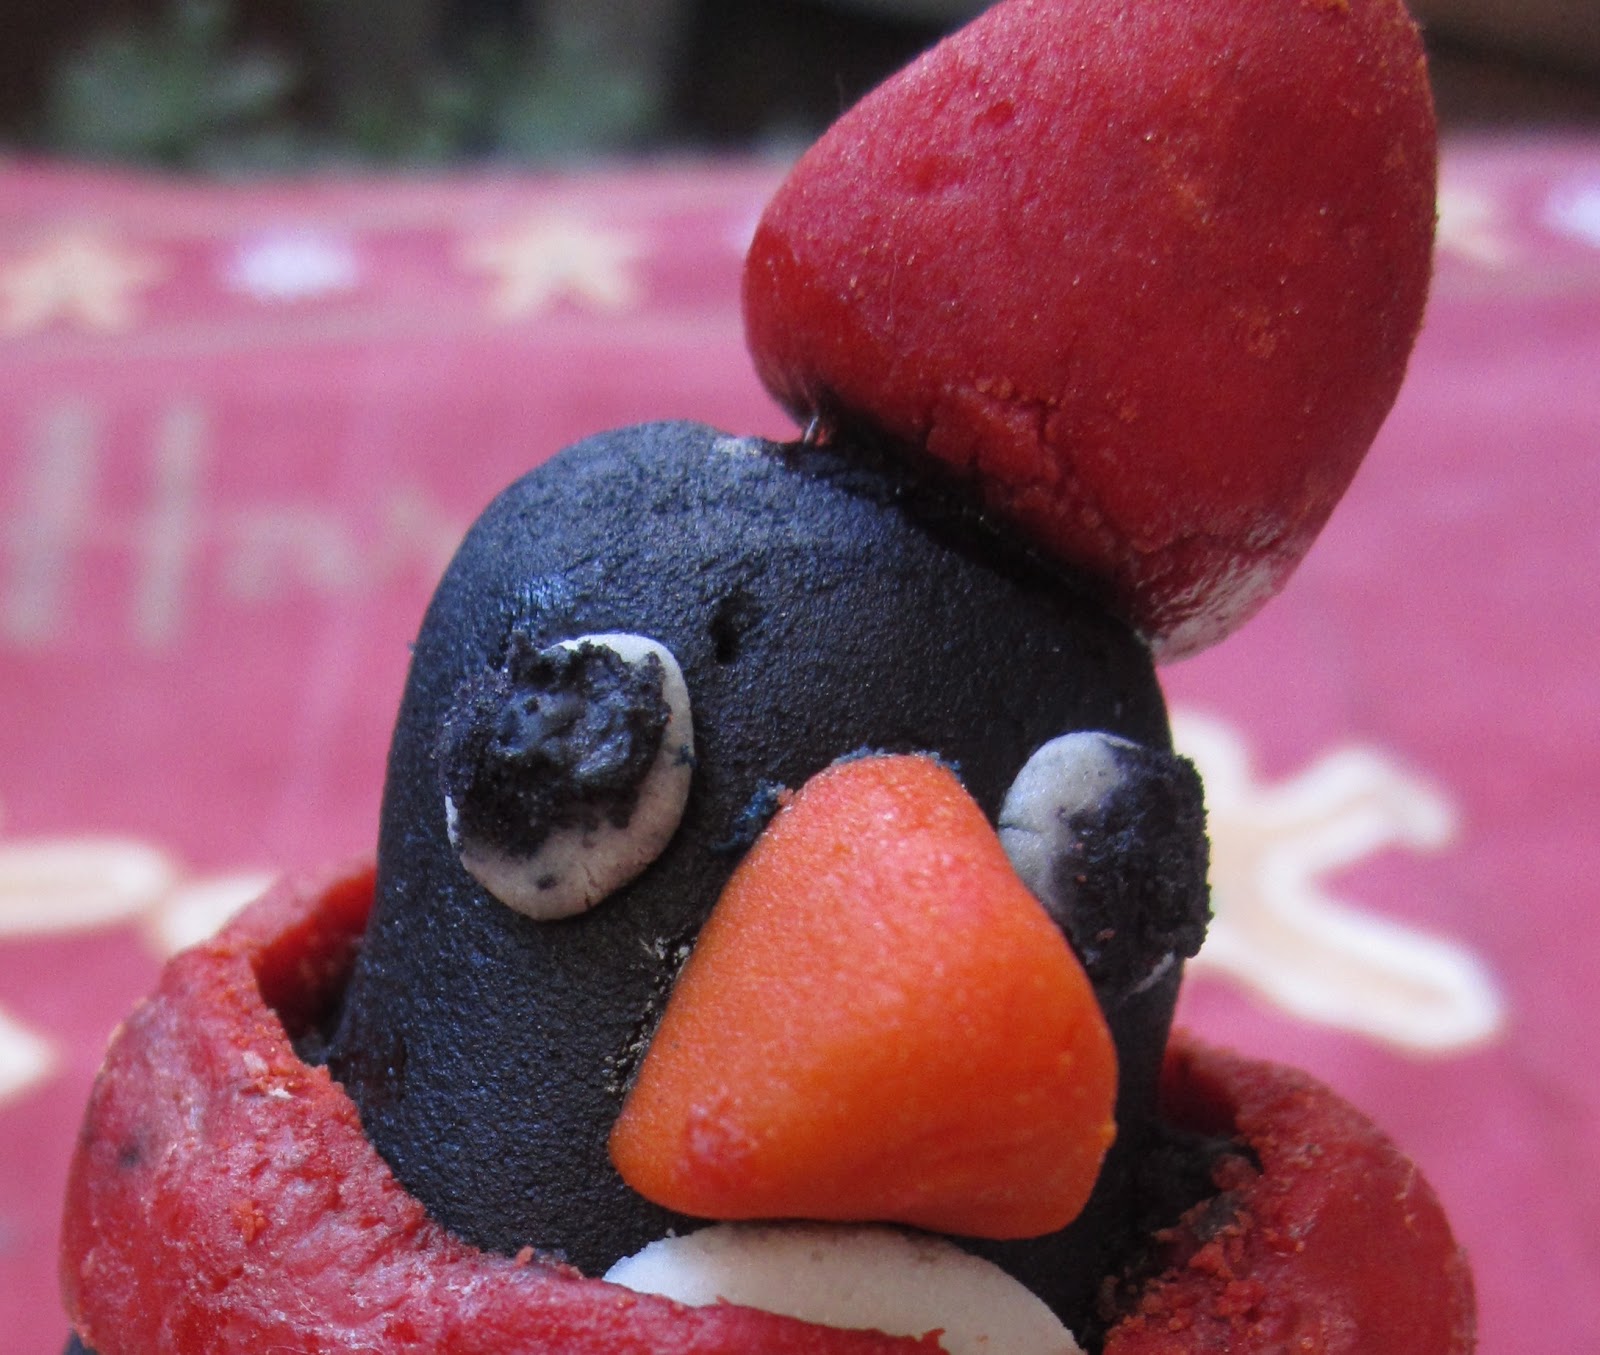
Cake twelve - A solitary Penguin


Get inspired


When decoration is more important than the cake itself.

Not all cakes need an elaborate decoration, some don’t have any at all and look gorgeous anyway, it all depends on the recipe and most of the times on the occasion we’re making them for. Cupcakes are very often the hidden structure of creative decorations which sometimes look like works of art. But here comes a big problem: how can you eat your creation after all your efforts? 

Any cupcake recipe is fine, I always choose vanilla cupcakes (see cake five) and add some grated lemon peel.

Decoration 

You need to make some fondant for the penguin, some royal icing for the penguin’s island and then some glacé icing for the nearby rocks and to cover all with snow.
I must say I was pretty scared to make fondant, I thought it was a kind of ‘mission impossible’, but with much patience and my younger daughter’s help I’ve made it! I’ve discovered kind of another galaxy of cake decorations: I’m a true fan of fondant now!

Fondant 

1 tablespoon egg white
1 tablespoon glucose syrup or light corn syrup
about 180/200 g icing sugar 
Put the egg white, syrup and about a quarte of the icing sugar in a bowl and mix to a smooth paste. Continue to mix in more icing sugar until it becomes too stiff to stir. Turn the paste onto the work surface and knead in more icing sugar to make a smooth, stiff paste. (don’t make it too soft or sticky, you’d have some difficulty when working it).
Add any coloring you need and wrap tightly in several thicknesses of plastic wrap, unless you’re going to use it immediately. It’s gonna be more difficult to work if it’s summer or you live in a hot country!

Royal icing

1 egg white - 200 gr icing sugar 
Put the egg white in a bowl or in a and whisk lightly to break it up. Work in the icing sugar until the icing has a thick and smooth consistency that just holds its shape.

Glacé icing 
200 gr icing sugar - 4 teaspoons water 
Combine icing sugar and water until smooth. Add water a little at a time until the consistency is smooth and the icing just holds its shape.

Making the penguin

What we need to make one penguin:
4 vanilla cupcakes
one teaspoon of orange jam
1 quantity glacè icing 
80 g black fondant
small pieces of orange, white and red fondant
1 raspberry gummy drop
black food colouring

1) The Penguin’s Island

Take one cupcake and spread it with some orange jam using a small spatula. Spoon some royal icing on top of the orange jam and spread to the edges. Drag a little icing over the side to form an icile-shaped point and then continue all around the edge of the cupcake creating iciles of varying lengths.

2) The Penguin

Divide the black fondant into two pieces, a bigger one of about 60 g and a smaller one. 
Mold the biggest piece of black fondant into an oval shape (lighlty dust your hands with some icing sugar). Flatten the base lightly and put it on the cupcake..
Draw one wing on parchment paper. Then divide the rest of the fondant into two pieces and roll them out thinly on the work surface. Place the wing template on the rolled fondant and cut two wings. Secure the wings in place with a damped paintbrush.
Now take a pea-sized piece of orange fondant and cut in half. Flatten each half and make two indents using a sharp knife. Position the feet in front of the body. For the chest, thinly roll out the cut fondant and cut an oval shape (3 x 3 cm). Secure to the front of the penguin with a dampened paintbrush.

3) Face

Shape a small triangular beak in orange fondant and secure in place with a dampened paintbrush. 
Make two tiny balls of white fondant, flatten them a bit and push them into the black fondant either side of the beak for eyes. Paint the centers of the eyes using a paintbrush and black food colouring. 

4) Hat and scarf

Make a small ball out of the red fondant, flatten the base and secure it to the top of the penguin’s head with a little of the glacè icing.
Thinly roll out the rest of the red fondant and cut out the scarf. Wrap around the neck and press gently. in place. Cut out two shorter lenghts of red fondant for the scarf ties. Cut decorative tassels at one end of eacj lenght, then secure to the front with a dampened paintbrush. 

5) Rocks and Snow

Use the other three cupcakes to make other rocks around the penguin, leave some space around the penguin to give better the idea of the sea. Cover the rocks and the areas around them with glacé icing.


also visit:
http://time-for-a-cake.blogspot.it/2012/10/cake-twelve.html