Saturday, 27 April 2013

Cake twenty three - Easter Eggs

Get inspired 

Patience is the secret ingredient for chocolate eggs and of course good quality chocolate!
It’s better to start from smaller chocolate eggs if it’s your first time.. 
Eggs can either be empty inside or solid, in which case you can fill them with a creamy chocolate mixture, some small meringues or crunched hazelnuts.

Plain Solid Eggs
200 g dark chocolate 
Cut chocolate in small pieces and place it in a heatproof bowl over a saucepan half filled with simmering water. Stir until it’s melted. 
Pour spoonfuls of the melted chocolate into the choco egg moulds until they’re filled up to the brim. Remove excess chocolate with the help of a knife to ensure a clean edge. Refrigerate until set. Carefully un-mould the egg halves and place them on a clean surface. Don’t touch them too much or they will start to melt from the heat of your hands. Heat a knife, take two halves, gently push them together and use the knife to stick them together. The blade musn’t be too hot or you’ll have holes in the egdes.
Follow the same procedure for bigger eggs.. 

Rich Solid Eggs
200 g dark chocolate
100 g milk or white chocolate
100 g small meringues
100 g crunched hazelnuts
Repeat same procedure to melt chocolate. Pour spoonfuls of the cholate into the mould, use a knife to scrape the excess chocolate from the mould. Give it a good vibrating shake so that all the air bubbles are gone. Scrape again. Let the chocolate sit for about 5 min, then flip the mould over allowing the chocolate to pour out. Scrape once more time to ensure the neatest shells. Flip it back. Cool a fe
w minutes. 


Now you can fill them with some melted milk or white chocolate and add some small meringues or hazelnuts to your taste. Let filling sit for about 15 minutes, then pour more melted chocolate over the mould. Scrape again to remove any excess. Refirgerate for 15 minutes. Then place in the freezer for 5 minutes and they’re ready to un-mould. Now carefully push the two halves together and use a heated knife to stick them together.

Fancy Chocolate Easter Egg
300 g dark, milk or white chocolate

Follow same procedure. Decorate to your taste.

Add some Rice Krispies when the chocolate is melted if you want to make a really special Easter Egg. 
Use Coco Pops if you’re making a white chocolate egg.

also visit: 
http://time-for-a-cake.blogspot.it/2013/04/cake-twenty-three.html

Monday, 1 April 2013

Cake twenty-two - Cheesecake delice

Get inspired


I think decoration is a key point in a cake and not only a matter of ‘appearance’: it’s your personal touch! 
Berries are a must for cheesecakes, I must say, and raspberries among them all are the best choice. I particularly love them for their bright colour which gives the cake a kind of luxurious look and secondly, but not certainly less importantly, for their taste which is a mix of sweet and sour juicy fragrance which easily blends in with most of the cakes and above all with cheesecakes.
It can be a yummy birthday cake in Summer!

250 g plain chocolate biscuits
150 g butter, melted
2 tbsp brown sugar
20 g butter, extra
300 ml thickened cream
50 g milk chocolate, chopped finely
3 tsp gelatine
60 ml water
500 g cream cheese
110 g sugar
3 Mars bars, chopped finely 
200 g. raspberries
Process biscuits until mixture resembles fine breadcrumbs, add butter. Process until just combined. Press biscuit mixture over base and side of 20cm round tin. Cover and refrigerate about 30 minutes or until firm. 
In the meantime combine brown sugar, extra butter and 2 tbsp of the cream in a small saucepan. Stir over low heat until sugar dissolves, to make butterscotch sauce.  
Combine chocolate and another 2 tbsp of the cream in another saucepan stirring over low heat until chocolate melts.
Sprinkle gelatine over the water in small heatproof jug. Place jug in small saucepan of simmering water and stir until gelatine dissolves. Cool 5 minutes.
Beat cheese and sugar in a bowl with electric mixer until smooth. Beat remaining cream in small bowl with electric mixer until soft peaks form. Stir slightly warm gelatine mixture into cheese mixture with Mars bar. Fold in cream. 
Pour half of the cheese mixture into the prepared tin, drizzle half of the butterscotch and chocolate sauces over cheese mixture. Pull skewer backwards and forwards through mixture to create marbled effect. Repeat process with remaining cheese mixture and sauces. 
Cover and refrigerate about 3 hours. 

also visit:
http://time-for-a-cake.blogspot.it/2013/03/cake-twenty-two.html

Sunday, 17 March 2013

Cake twenty-one - Spring Swirl

Get inspired

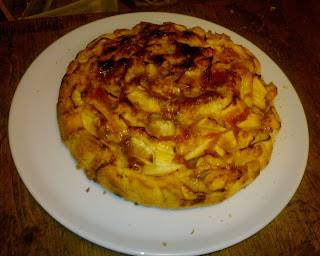
A good cake to cheer you up in the morning or any time you need sometihng sweet to make your day a better day! It might seem one of the so many apple cakes, but it is not! Just try!


100 g sugar
100 g butter
200 g flour
50 g cornflour
2 eggs
75 ml water
1 lemon, grated rind and juice
1/2 packet baking powder
3/4 apples 
Beat butter and sugar with electric mixer until smooth and creamy, then add grated rind and water. Beat in the eggs, adding some flour after each egg. Finally stir in the flours and baking powder. 
Line a 24 cm round cake pan with baking paper. Pour mixture into pan. Peel, core quarter and thinly slice apples. Arrange the sliced apples in circles on the mixture and sprinkle with lemon juice. 
Bake for about 50/60 minutes at 180°.

also visit: 
http://time-for-a-cake.blogspot.it/2013/03/cake-twenty-one.html

Cake twenty - The king of cheesecakes

Get inspired

Cheesecakes can be divided into baked and chilled. This is a baked cheesecake, it means you have to bake it  and let it cool down before refrigerating. It’s not difficut at all to make but you need to be patient, the waiting time is quite long. The result anyway is a sure success!

Brownie base
125 g butter, chopped
150 g dark chocolate, chopped coarsely
1 egg
150 g sugar
110 g flour
35 g self-raising flour
Combine butter and chocolate in small saucepan, stir over low heat until smooth. Cool. In the meantime beat egg and sugar with electric mixer until creamy, add chocolate mixture and flours. 
Line 20cm square cake pan with baking paper, spread mixture into pan and bake for 10 minutes at 180°.

Topping
250 g cream cheese or mascarpone cheese
75 g sugar
1 egg
125 ml cream
Beat cheese, sugar and egg with electric mixer, add cream. Do not overbeat.. 

Pour topping over brownie base. Bake for about 15 minutes. Cool in oven with door ajar. Refrigerate for at least 3 hours.
Serve topped with chocolate sauce and fresh raspberries or strawberries, if desired. 


also visit:
http://time-for-a-cake.blogspot.it/2013/02/cake-twenty.html

Sunday, 10 March 2013

Cake nineteen - Father Xmas's House - Assembling the house

Get Inspired

Step 4: Assembling the house  
This is in my opinion the most difficult and delicate phase. You need not to hasten to assemble the house all at once and wait the necessary time until the icing has stuck the various parts together. 

Doors and windows
You need some glacé icing (white, green and red), fish glue sheets and sugar decorations to your taste. 
Glacé icing 125 g icing sugarfood colours to your taste2 teaspoons water

Mix sugar and water well, then add some drops of colour until you reach the shade you want.

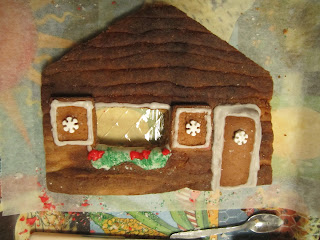
Decorate doors and window shutters with icing and sugar decorations as shown in photos. Wait until icing is well dry. In the meantime place the walls with holes for the windows upside down onto some parchment paper. Pipe some icing at the corners of the windows, put a fish glue sheet (the window glass)
over the hole and press it very well so that the icing can make the ‘glass’ stick to the wall. When icing is dry, place decorated shutters at each side of windows. Don’t forget to hang your Xmas wreath above the door!

House 

You need a big quantity of royal icing (four egg whites)
Royal icing 
1 egg white 
220 g icing sugar
Beat egg white in a bowl with an electric mixer, add icing sugar, a tablespoon at a time. Beat until icing reaches firm peaks. 

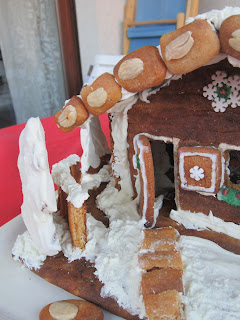
Now take the biggest rectlangle and put it onto a big tray, the tray should be of about 1m x 50/60 cm. Use some icing to draw the perimeter of the house in the middle of the rectangle. Pipe some icing along the side walls of the front wall and one side wall. Place side and front wall onto the corresponding side along the perimeter. Press them together and wait until icing is dry. Then do the same with the back and the other side wall. Now position the inside wall in the middle of the house. Always use some icing as glue. 
Wait until icing is well dry. In the meantime put the door in the right place and build the fence. Now cut the rectangle for the roof in two, and position the two parts onto the hosue walls. Always use enough icing as glue. When icing is dry, stick the 20 bricks onto the front and back walls and the chimney onto the roof. Cover the house with snow.

Park
Make your trees look white with snow. Then put some of them at the back of the house and some in the front. Put reindeer in the front garden. Cover the park with some snow. 


also visit:
http://time-for-a-cake.blogspot.it/2013/01/cake-nineteen.html

Cake nineteen - Father Xmas's House - Making the structure

Get inspired

Step 3: Making the structure
Honey-based dough, Gingerbread dough, 20 almonds
House
Line an oven tray with paper. Roll out the honey-based dough into long strings which should be about 40 cm long and 1 1/2 cm wide. Place the strings into an oven tray leaving some space in between so that the strings will look like wooden logs in a chalet.
Bake  at 200° for about 20/30 minutes. 

Line two oven trays with paper. Leave some dough aside for the bricks, the doors and the windows. Roll out the rest of the dough into two 1 cm thick rectangles, a smaller one of about 25 x 15 cm which will be used for the roof and a bigger one, the  size of an oven tray, which will be the base of our house. 
Place them onto the oven trays and bake at 200° for about 12/18 minutes.
Use templates to cut out the house walls. Cut an extra front wall which you will use as an inside wall to strengthen the house structure.

Bricks, doors, window shutters, chimey and fence
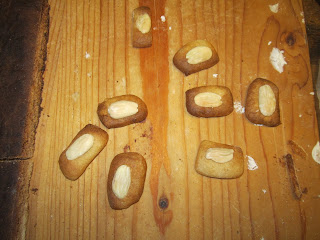
Roll out some dough to 1/2 cm thick. Firstlly make 20 bricks for the two facades: cut dough into 2 x 1 cm rectangles and put an almond in the middle. Secondly make two doors and six window shutters (see templates for size), then the chimney and fencing. Place them onto an oven tray and bake at 200° for about 12/15 minutes.
Park 
Roll out the gingerbread dough and cut some trees of different sizes and a reindeer. Place them onto an oven tray and bake at 200° for about 12/15 minutes.

also visit:
http://time-for-a-cake.blogspot.it/2013/01/cake-nineteen.html

Sunday, 3 March 2013

Cake nineteen - Father Xmas's House

Get Inspired

There are a few things you should consider before making a biscuit house, time, patience and possibly help. You must also change your point of view: you’re not making a cake, you’re building a house! Yes! You’ll be more like an architect in the first phase and then you need the expertize of a bricklayer to make it stand. If you, for example, don’t use the appropriate materials to stick all the parts together your house will  collapse. 
It’s going to be a real project. You’ll have to design the house starting from its size including all details: windows, doors, roof, a chimney, the garden around, with trees and paths; you’ll have to prepare the stencils of each part of your house; you’’ll have to choose the materials, i.e, what kind of biscuit dough to use for the sinlge parts; you’ll have to make and bake the doughs; to cut all the parts, to build your house and surrounding park and finally to decorate it.
It’ll take quite a long time to see it ready but all your efforts will be rewarded! Consider at least four days from project making to decoration.

Step 1: Design 
A very importatnt step| Decide what your house will look like. Prepare the cardboard templates of the house: walls, roof, and door, choose the cookie cutters for the trees and reindeers and decide the choco decorations for doors and windows.
Here are my templates.
Step2: Dough
I usually make two different doughs, one for the house and one for the decorations. when I want my house to look like a wooden mountain chalet. The dough I use for the house is made with a lot of honey which gives the structure the look and strength of real wood while the gingerbread dough is good for the trees and the decorations.

Honey-based dough (for the house)
1 kilo honey
1/4 l water
1,250 g flour
200 g candied orange and citrus 
40 g cinnamon, ginger, muskat nutmeg
30 g baking soda
Combine the honey and water in a saucepan and heat to boiling, stirring continuously. Let cool. Put the flour and the candied fruit on a pastry board, make a hole in the middle, pour the honey mixture and knead well. Add the baking soda and knead until smooth. Cover and let rest at room temparature for one or two days. 

Gingerbread dough (for the decorations)
100 g butter
250 g honey 
250 g sugar
1 tsp ginger
1tsp cinnamon
1/2 tsp pepper
1 tsp cocoa powder
500 g flour 
1/2 packet baking powder
one pinch of salt
2 eggs
Combine the butter, honey, sugar, spices and cocoa in a saucepan, and heat to boiling, stirring continuously.. Let cool. Add the flour mixed with the baking powder,, the salt and the eggs. Stir with a wooden spoon at first then pour the mixture onto a floured surface and knead well. Wrap in aluminium foil and let rest overnight. 

also visit: 
http://time-for-a-cake.blogspot.it/2013/01/cake-nineteen.html