Sunday 25 August 2013

Cake twenty-nine Symphony in red, black and white

Get inspired

This time my task was not easy: cupcakes which had to be ready one day ahead and needed to be transported for about 200 km. and, to make things more complicated, we'd have to eat them in the university courtyard with no tables or seats available. We went on for weeks talking about the right size of the cupcakes, the right recipe, the type of icing or frosting and, of course, of decoration that would resist a three-hour drive. We also needed a tray or something similar to transport them safely to destination, something nice of course that’d suit a graduation ceremony.
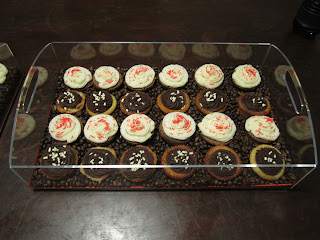
After some wandering in town I found a plexiglass tray that looked perfect for this purpose, but I still didn’t know how to keep the cupcakes well separated one from the other: I was afraid they’d be all messed up and the decoration would be destroyed. Coffee beans was the answer! And it did work well! The cupcakes arrived in a perfect state and what’s more they had an unexpected aftertaste of coffee that made them special!
We chose to make two different tastes with different decorations and decided on the smaller size for the cupcakes  The colours would be red and white for one type (red is the  typical colour for graduation here) and black and white for the other type. 

Symphony in red and white
250 g butter
250 g flour
250 g sugar
3 eggs
150 g choco chips
Beat the butter and sugar until light and fluffy. Add the eggs, one at a time (don’t forget to beat in some flour between additions) and then the flour. Fold in the chocolate chips. Pour mixture into cupcake cases and bake at 180° for about 15 minutes. 

White chocolate frosting
100 g white chocolate, chopped
3 tbs milk 
175 g icing sugar 
Put the chocolate and the milk in a heatproof bowl and rest the bowl over a saucepan of gently simmering water. Leave until the chocolate has melted, stirring frequently.
Remove the bowl from the heat and stir in the icing sugar until smooth. Use freshly made. 

Decoration
red food coloring
chocolate sprinkles
red sugar sprinkles
Divide the white chocolate frosting and put them into two bowls. Beat some red food coloring into one bowl until the desired shade is reached. Put the red frosting into a pastry bag and pipe generous swirls of frosting over the cupcakes and decorate with chocolate sprinkles. Repeat same operation with the white chocolate frosting.

Symphony in black and white
250 g butter, chopped
150 g white chocolate, chopped coarsely
225 g flour
75 g self-raising flour
440  g sugar
250 ml milk
2 eggs, beaten lightly
150 g choco chips
Combine butter, white chocolate, sugar and milk in medium saucepan. Stir over heat, without boiling, until smooth. Cool 15 minutes. Whisk flours into white chocolate mixture then whisk in eggs. Pour mixture into prepared cupcake cases and bake at 150° for about 20 minutes. 


White Chocolate frosting
see above

Dark Chocolate Frosting
100 g dark  chocolate, chopped
2 tbs milk 
50 g butter
150 g icing sugar 
Put the chocolate, the milk and the butter in a heatproof bowl, stirring frequently until the chocolate and butter have melted. 
Remove the bowl from the heat and stir in the icing sugar until smooth and shiny.

Decoration
red sugar sprinkles 
chocolate sprinkles
Put the white frosting into a pastry bag and pipe generous swirls of frosting over the cupcakes and decorate with chocolate 
sprinkles. Repeat same operation with the dark frosting.

also visit: 
http://time-for-a-cake.blogspot.it/2013/08/cake-twenty-nine.html

Sunday 4 August 2013

Cake twenty-eight Lilac Chic

Get inspired

There’s something in the tiered cakes which attracts me a lot. It’s like a personal challenge, the kind of ‘Will I be able to make it?’, in other words a chance to test my skills. Sure, but not only! There’s also some unconscious reason which takes me back to a happy memory from my childhood: a photo of one of my first birthdays, me with my parents and a two-tiered birthday cake decorated in white with some silver pearls my mum had made for me.. 
Although decoration is very important as it’s what we see first, the choice of the cake is nonetheless relevant since it’s what we actually eat.
When making a tiered cake you should always choose a solid cake which can stand the weight of the other cakes you put on top. 
For this cake we chose three different cakes which all have, anyway, a common ingredient - chocolate. (My younger daughter loves it...)

Phase 1: Recipes

Dark Chocolate Mud Cake
250 g butter, chopped
150  g dark chocolate, chopped
440 g sugar
250 ml milk 
225g flour
75 g self-raising flour
2 eggs, lightly beaten 
2 tbs cocoa powder
150 g fresh raspberries
Put butter, chocolate, sugar and milk in medium saucepan, stir over heat without boiling, until smooth. Cool 15 minutes. Add flours, eggs and raspberries.  
Line base and sides of a 30cm-round cake pan with baking paper. Pour mixture into pan. Bake at 150° for 50 minutes. Cool cake.

White Chocolate Mud Cake
250 g butter, chopped
150  g white chocolate, chopped
440 g sugar
250 ml milk 
225g flour
75 g self-raising flour
2 eggs, lightly beaten 
2 tbs cocoa powder
150 g fresh blackberries or 150 g choco drops
Same procedure as Dark Chocolate Mud Cake.
Bake two cakes: one in a 30cm round cake pan - use blackberries; the second one in a 24cm round cake pan - use chocolate drops.

Chocolate icing
200 g chocolate, chopped
200 g icing sugar
1 egg
Melt chocolate in small saucepan over boiling water. Cool. Add egg and icing sugar. Stir until smooth.

Chocolate Butterscotch Cake
25 g cocoa powder
250 g butter
200 g brown sugar
2 eggs
1 tbs golden syrup
185 g self-raising flour
125 ml milk
Beat cocoa, butter, brown sugar, eggs, golden syrup, flour and milk with electric mixer until combined.
Line base and sides of a 18 cm-round cake pan with baking paper. Pour mixture into pan. Bake at 180° for about 1 hour. Cool cake.

Mascarpone Cream
250 g mascarpone cheese
300ml thickened cream
Mix mascarpone and cream until soft peaks form.

Caramel Icing
60g butter
100g brown sugar
60ml milk 
240g icing sugar
Heat butter, brown sugar and milk in small saucepan, stirring constantly, without boiling, until sugar dissolves. Remove from heat. Add icing sugar and stir until smooth.

Phase 2: Tiers
Here’s a sketch of the cake showing details of each tier.
1. Chocolate Butterscotch Cake
2. White Chocolate Mud Cake (with raspberries)
3. White Chocolate Mud Cake (with choco drops)
4. White Chocolate Mud Cake (with raspberries)
5. Dark Chocolate Mud Cake (with blackberries)

A. Mascarpone & Caramel Icing
B. Choco Icing

Phase 3: Decoration
purple and peach food colour
600/700 g ready-made white fondant
some corn starch
Assemble and decorate each tier separately. 

Bottom tier
Take the Dark Chocolate Mud Cake and place it onto serving plate.  Spread with chocolate icing.
Take the 30cm round White Chocolate Cake and split into two layers. Put one layer on top of cake and leave second layer aside for middle tier.
Dust a large nonstick mat lightly with corn starch and knead fondant until smooth and pliable.
Roll fondant out in the approximate shape of the cake. Roll fondant up around rolling pin and then place it onto the cake. You can cut out the centre of the circle if you don't have enough fondant.
Add some purple and peach food colour to some white fondant and knead until you have the colour you like. Roll it out and cut about 30 2cm wide circles. 
Decorate cake with some of the circles using some mascarpone cream to help them stick to the cake.

Middle tier
Cut the second 30cm round White Chocolate Cake layer the same size as the 24cm round White Chocolate Cake. 
Place one 24cm round cake on a plate, spread with chocolate icing and put second cake on top.
Colour some fondant the same shade as the spots and follow same procedure as per cake from bottom tier.

Top tier
Split Chocolate Butterscotch Cake into three layers. Put one layer on a plate, spread with some mascarpone cream and some caramel icing. Repeat with second and third layer. Cover cake with white fondant and purple spots.

Phase 4: Assembling the cake 
Once all cakes are ready assemble the cake and carefully put one tier on top of the other.